If you’re planning to polish a car, there’s one thing you need to know: proper prep is key to achieving flawless results and avoiding any damage. Polishing without the right preparation can leave scratches or lock-in contaminants, keeping you from that showroom shine.
In this guide, I’ll walk you through the essential prep steps – like decontaminating, taping, and inspecting to ensure your car’s paint is ready for a perfect polish.
Don’t skip these steps if you want a finish that truly stands out.
To prepare your car for polishing or compounding, do the following:
1. Wash The Car
First things first, you need to remove all the dirt, dust, and grime from your vehicle. The main goal is to get as clean paint as possible, and you’ll be able to do it with a detailed car wash.
Here’s a quick guide:
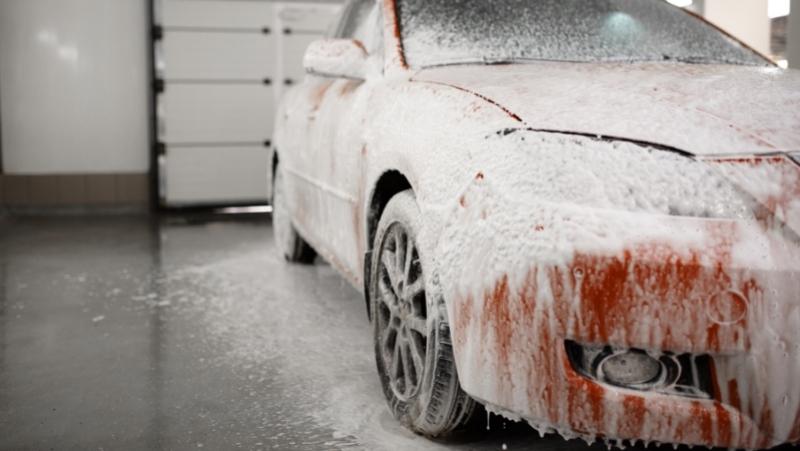
- Pre-rinse the car
- Pre-wash the car with snow foam
- Rinse it again
- Wash the vehicle with car soap for stripping waxes and sealants
- Rinse the car
- Dry the vehicle with a microfiber towel
Usually, I suggest using pH-neutral car soaps that won’t damage waxes, sealants, and glazes, but this time is different. To prepare your car for polishing, you should remove all protectants from the car’s paint.
So, use some car soap to strip off waxes and sealants. I like to use Chemical Guys Clean Slate for this purpose, but any other similar product will work.
If you leave waxes and sealants on the paint, they’ll stay between the polishing pad and the color. That way, you’ll have to clean the pads all the time, and the polishing process will take much more time than usual. Also, the results won’t be nearly as good.
When you finish washing and drying your vehicle and the paint is spotless from dirt and debris, you can continue to the next step.
2. Decontaminate The Car’s Paint
Even though the paint is clean from all the dirt and grime, there’s probably still plenty of contaminants on it, especially if the car was neglected or had never been clayed before.
Claying the vehicle will remove all the contaminants from the paint and make it the cleanest possible. Also, claying helps to remove waxes and sealants from the color.
Before I tell you how you should clay your vehicle, you need to know what type of clay bar you should use.
Usually, there are three types of clay bars:
- Fine: for newer cars that don’t have plenty of contaminants on the paint
- Medium: for cars that have plenty of contaminants, but the color is not that bad
- Heavy-duty: for old vehicles that have been neglected for years and have very contaminated paint
My recommendation is to use medium or light clay bars for most vehicles. You’ll rarely need a hard clay bar. So, for claying your car, you’ll need the following:
- Clay bar (fine, medium, or heavy-duty)
- Clay bar lubricant
- Few microfiber towels
How To Clay Bar Your Car
There are only a few steps you should follow when claying your vehicle. It’s pretty simple and doesn’t require any special knowledge.
Here are the steps for car paint decontamination:
- Start from the top to the bottom.
- Use plenty of clay bar lubricant to avoid scratching the paint. Spray it onto the surface, and start claying.
- With clay bar, go only in straight directions: up and down, left and right. Don’t make circular motions.
- Don’t use too much pressure. Just gently press the clay bar.
- Work in small 2×2 sections.
- Whenever you finish one panel, wipe it with a clean and dry microfiber towel.
- After each panel, fold the clay to get the clean clay again.
- If the clay bar falls to the floor, it’ll be full of dirt particles. In that case, take another one.
It’s not rocket science. You only need to be careful and “detailed.” That’s the golden rule of auto detailing, I think.
Before claying, the paint will feel rough and raspy, and that’s because of contamination. When you finish claying, run your fingers through the paint, it should have a smooth feeling. That means that the color is clean from any contaminants.
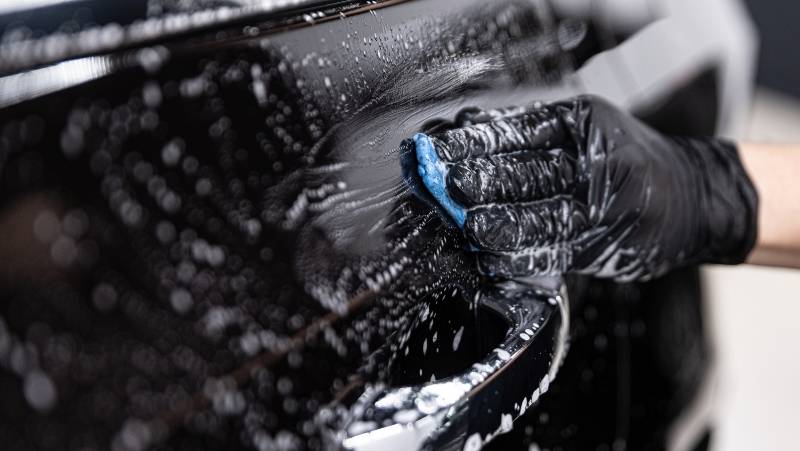
3. Remove Old Waxes and Sealants From The Paint

When you’re finished with claying, the paint will be almost 100% clean. However, if you have wax or sealant on your car, there’s a chance that it’s still on the paint, especially if you had sealants since they are harder to remove than waxes.
Again, to begin polishing your car, you should get rid of all paint protectants, and that’s the reason why I’m doing this final step.
Even if the car didn’t have any protection before, I’d still do this step. It’s because there might be some oils on the paint, and this mix will remove them, too.
To ensure that there are no paint protectants and oils on the paint, I mix rubbing alcohol with distilled water in a 50/50 ratio.
Then, I use that to gently “wash” the car once more. That way, I’ll be 100% sure that nothing will be between my polish pad and the paint.
Follow these steps to remove old waxes and sealants:
- Mix isopropyl alcohol and distilled water. You can mix it in a spray bottle. I always use a 50/50 ratio.
- Spray one panel and gently wipe it off with a clean microfiber towel.
- Make sure to work on one panel at a time.
The best thing about rubbing alcohol is that it’s self-evaporating, so it’ll quickly dry on the surface. Wiping it off with a clean microfiber towel will be enough to get the paint dry.
Also, it leaves no residue, which means that the paint will be 1000% clean after wiping it with an isopropyl and distilled water mix.
4. Tape Delicate Areas and Materials
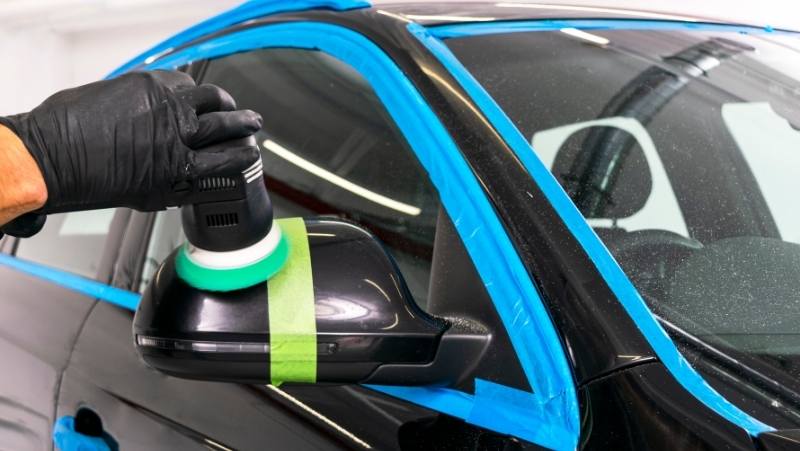
The last step is taping all the delicate areas and materials. I like to tape some sharp edges and tape all the plastics and rubber that may contact a polisher.
Polishes and compounds can be dangerous for plastics and rubber. They can leave marks on plastics and rubber that are very hard to remove.
Also, if there are some highly sharp edges on the paint, you might want to tape them too. Those sharp edges may get burned when polishing, especially if you’re a complete beginner working with a rotary.
Of course, if you’re skilled, you can do it without taping, but you’ll have to be extra careful.
I think that it’s much easier to tape everything before polishing or compounding, so you’re entirely safe to work.
5. Inspect The Paint
After completing all the necessary preparation steps, it’s time to carefully inspect the paint of your car. This step is crucial to identify the areas that need more attention and to determine the right polishing method.
Identifying Deeper Scratches
During your inspection, pay close attention to any deeper scratches that may be present on the paint surface. These areas will require more attention during the polishing process. It’s a good idea to make a note or even mark these areas so you can give them the extra care they need.
Related: Types of Car Scratches
Determining the Polishing Method
The condition of your car’s paint will dictate the type of polish you should use. If the paint is in relatively good condition with only minor imperfections, starting with a fine polish might be sufficient.
However, if the paint shows signs of significant wear and tear or deep scratches, you may need to start with a heavy-cut compound.
Frequently Asked Questions
As a complete beginner, I always had tons of questions. That’s the reason why I decided to write another few hundred words and answer the most common questions about this topic.
Preparation removes dirt and contaminants that can scratch the paint during polishing, and it allows the polish to work more effectively.
Deep scratches may require more intensive treatment, like a heavy-cut compound or a professional repair.
Yes, washing your car removes surface dirt and debris that could potentially scratch the paint during the polishing process.
Polishing can remove minor scratches and swirl marks, but deeper scratches may require more intensive treatment.
The type of polish depends on the condition of your paint. Fine polish is suitable for minor imperfections, while a heavy-cut compound is needed for significant wear and tear.
Final Words
Now that you’re finished preparing your car for polishing, you can go and start polishing your car. Here is my guide for hand polishing the vehicle, so feel free to check it out. It might help you.