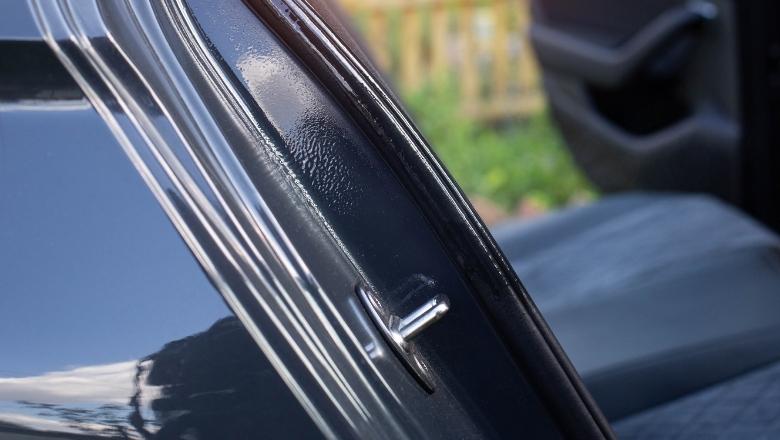
Many cars have worn and ugly rubber seals. The reason for worn and damaged rubber around car windows is that very few people actually clean and protect them on a regular basis. In this article, I will teach you how to clean car window seals, but more importantly, how to protect them against fading and damage.
Key Takeaways:
- Cleaning car windows and car door seals is done by using several tools, such as a pressure washer, wash mitts, and detailing brushes.
- Applying rubber protectants to rubber trim around car windows helps to maintain window seals and prevent them from wearing and tearing.
- If you ignore the rubber trim around car windows, it makes the car look bad, lets in more noise, and doesn’t keep out weather like rain, snow, and wind as well.
How To Clean Car Window and Door Seals
First, let’s talk about cleaning rubber trim around car windows and doors. In order to properly protect it, it has to be clean in the first place. You should clean it whenever you’re washing your vehicle. That way, it’ll last longer and look like new for a long time.
1. Pressure Wash Rubber Trim
When pressure washing your vehicle, thoroughly pressure wash the rubber trim around the car windows. The pressure washer will remove most of the dirt from it, making it ready for the next step.
Make sure to use a pressure washer on the outer trim only. There’s also an inner rubber trim when you open the door, but don’t use a pressure washer over there since you could spray the whole car with water.
2. Clean The Outside Trim With Wash Mitt
When doing a contact wash with a wash mitt and car wash soap, make sure to clean the rubber trim thoroughly. Car wash soap will break most of its dirt, so it’s ready to protect.
If you don’t know what a wash mitt is, it’s a specifically designed microfiber product that’s used for safe and non-scratchy washing of vehicles.
3. For Extremely Dirty Rubber Trim, Use Detailing Brush
If the rubber trim on your vehicle is extremely dirty, you should use the detailing brush with some soapy water or APC (all-purpose cleaner) and agitate the trim.
A detailing brush will enter all the pores and thoroughly clean the trim. Again, you don’t have to do it if all the dirt and dust were removed when washing with a wash mitt.
4. Clean Inner Rubber Seal
The inner rubber seal is located between the doors and the chassis. Usually, it won’t be so dirty, but it’ll depend on how often you clean your car and how thoroughly you clean it.
I like to take a microfiber cloth, spray it with APC, and wipe the inner rubber trim. While cleaning it, you’ll probably realize that rubber trim makes your microfiber cloth black. That’s because it’s started to wear, and it needs protection
If it’s extremely dirty, you can use a detailing brush to clean it more thoroughly. Just make sure not to skip any areas, and be as detailed as possible.
5. Dry The Trim With a Drying Microfiber Towel
When you’re drying the vehicle after a thorough wash, try to dry rubber seals as much as possible, especially when we talk about the inner rubber trim.
I like to use a different microfiber towel for the inner rubber trim since it’ll probably leave some black color on it (I don’t want to ruin expensive drying towels for that).
How To Protect Rubber Trim Around Car Windows
Okay, now that the rubber trim around the car windows is clean, you should apply some protection to it. It’s important not to skip this step. Otherwise, you might end up with worn rubber trim in just a few years.
This will help prevent your exterior trim from drying out and cracking due to sun exposure while also preventing nasty stains from bird droppings and other road gunk. If there are already cracks in the trim, this might not be too effective, so you’ll have to replace them if they’ve deteriorated beyond repair.
Just follow the steps below, and you’ll learn how to protect the rubber trim on your vehicle.
1. Buy a High-Quality Rubber Seal Protectant
Many products on the market claim to protect your rubber trim, but they may contain harmful chemicals or solvents that can actually damage your trim even more.
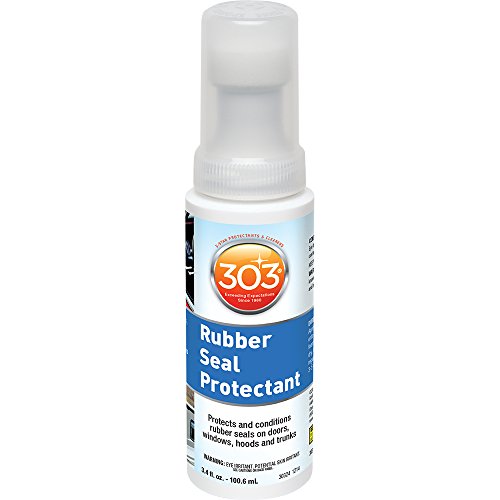
I suggest using products such as 303 Rubber Seal Protectant, which has no solvents or petroleum distillates that can damage your trim.
This high-quality protectant goes on easily and dries quickly, leaving behind a long-lasting barrier that repels water and dirt. It also restores color and shine to faded and dull rubber trim above your car’s windows and doors.
You can also use 303 to protect and restore the seals around the car sunroof, which will help prevent the sunroof from leaking.
2. Apply The Protectant
Use a soft cloth or foam applicator to apply the rubber seal protectant on the trim evenly. It’s best to start from the center and work your way out so that you don’t end up with unsightly overlapping marks.
Once you’re done, let it sit for about two minutes, and then wipe off any excess by using a clean microfiber towel. And that’s it. The rubber trim around your car windows is now clean and protected.
The Purpose of Car Rubber Seals
The rubber around car windows and door, commonly known as window seals, serves a specific purpose. It’s not just there for decoration or to give a finished look to the car.
After reading about its purpose, you’ll realize why it’s so important to clean and protect car window seals. Let’s dive into why rubber trim around car windows is so important.
Sound Barrier
Ever noticed how peaceful it feels inside a car, even when it’s bustling outside? That’s largely thanks to the car window seals.
The rubber around car windows acts as a sound barrier. When you’re driving, it helps keep out the noise from honking horns, loud engines, and the general hustle and bustle of the streets. It’s like a protective shield, ensuring that the inside of the car remains a quiet sanctuary, allowing you to focus on the road and enjoy music or conversation without constant interruptions.
Protection From Weather Elements
One of the things I truly appreciate about car window seals is their role in shielding us from unpredictable weather.
On rainy days, they prevent water from seeping in, keeping the interiors dry. During hot summers, they help maintain a cooler temperature inside by blocking out excessive heat.
Frequently Asked Questions
While browsing the internet about this topic, I realized that many people have some questions about cleaning and protecting rubber trim, and in this section, I’ll answer some of the most frequent ones.
Well, you should try using the method above first, and if that doesn’t fix the problem, you could then try to use some colored rubber seal protectants, which will bring them back to life.
While some people like to use WD-40 on everything, I wouldn’t recommend you do that. At first, it may look great and shiny, but it won’t stay there so long because the rubber won’t be able to soak it fine. Use 303 Rubber Seal Protectant instead.
Even though silicon spray is great at protecting things, I don’t recommend you use it on rubber seals since they’ll become sticky and attract dirt and dust.
In general, rubber protectants should be applied every couple of months or so, but many people find they can go longer between applications. When in doubt, stick with every three months as a good rule of thumb.
Final Words
To clean and protect car rubber seals, all you need is a few quality products, a little bit of time and effort, and the proper know-how, and you’ll be able to keep your car’s rubber trim looking fresh and shiny for years to come.
If rubber seals on your car are already worn, here’s a great video on how to revive rubber seals on your vehicle: