There’s a secret to getting crystal-clear headlights without breaking the bank. Forget about replacements – the answer is headlight polymerization. Let’s find out how this technique works wonders for your car.
Key Takeaways:
- Headlight polymerization lets you restore old, hazy headlights instead of replacing them, saving you a lot of money.
- This technique delivers longer-lasting clarity and protection compared to just polishing your headlights.
- Polymerization dramatically improves your night driving visibility and keeps your car looking sharp.
- The process is surprisingly simple and can be done at home with a headlight polymerization kit.
- For maximum protection, consider applying a ceramic coating or PPF film over your polymerized headlights.
What is Headlight Polymerization and How Does it Work?
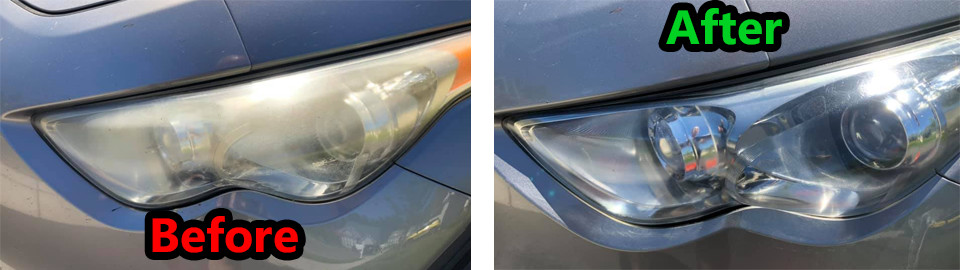
Headlight polymerization is a process that restores the clarity of old, yellowed, and hazy car headlights.
First, the headlight is carefully sanded to remove the damaged outer layer. Then, a special liquid containing polymers is heated and turned into a vapor. This vapor bonds directly to the headlight surface, filling in minor scratches and creating a new, crystal-clear protective barrier. This barrier also shields the headlight from harmful UV rays.
Why Headlight Polymerization Might Be Your Best Pick
There are several reasons why I suggest you try out headlight polymerization instead of other techniques for repairing hazy car headlights.
- Cost-Effective Solution: Save big compared to replacing your entire headlights. Headlight polymerization kits are a fraction of the cost of new assemblies. Plus, you won’t need to invest in expensive polishing machines or multiple polishing pastes.
- Longer-Lasting Protection: Unlike traditional polishing, polymerization creates a new protective layer on your headlights. This means superior resistance to yellowing, fading, and oxidation. Polymerization alone typically protects for 2-3 years, and you can always add an extra layer of ceramic coating for even more durability!
- Boost Visibility and Safety: Murky, yellowed headlights seriously limit your vision at night. With polymerization, you’ll restore the full brightness and clarity of your headlights, making night driving safer. It can even help you avoid traffic tickets or failing vehicle inspections due to faulty lights.
- DIY Friendly: Polymerization is suprisingly easy! You can do it at home with a simple kit and a few basic supplies. No need for a dedicated workshop space – your garage or drveway wll do just fine. The essential tools are water, microfiber cloths, sandpaper, and your polymerization kit.
Step-by-Step Guide to Headlight Polymerization
Step 1: Preparation
Before we start, let’s gather everything you need and take some safety precautions:
- Gather your supplies: Sandpaper (400, 600, 800, 1200, 1500 grit), microfiber towels, soapy water, a headlight polymerization kit, and masking tape.
- Safety first: I highly suggest that you wear safety gloves and a mask during the whole process to avoid inhaling any of the chemicals in the polymer.
- Mask around the lights: Protect the paint around your headlights with masking tape to prevent accidental scratches.
If you’re looking for a headlight polymerization kit, I highly suggest that you check out the one from ROYWOO company.

Step 2: Cleaning
You can’t just go and start sanding the headlights. You should always clean the headlights first, at least, that’s what I do every single time:
- Wash thoroughly: Ensure your headlights are free of dirt and grime. Spray them with soapy water and wipe them off with a clean microfiber towel. If you have a high-pressure washer, even better, you can use it to quickly get rid of all the dirt, dust, and grime.
- Dry completely: Use another microfiber towel to dry the headlights thoroughly so they’re not wet anymore – it’s important for the dry sanding part.
Step 3: Sanding
Careful sanding removes the damaged outer layer, preparing the surface for polymerization:
- Start with dry sandpaper: Began with dry 400 grit sandpaper, working over the entire headlight surface 2-3 times. Then, wash, dry, and repeat with dry 600 grit sandpaper.
- Switch to wet sanding: Now wet the headlight, then start with 800 grit wet sandpaper. Progress through 1200 and finish with 1500 grit. Make sure to wash and wipe headlights between different sandpapers. This process smooths the surface and removes any residual yellowing.
Step 4: Final Wash
One final wash makes sure we’re working with a perfectly clean surface:
- Remove all residue: Wash the headlights again to ensure no dust remains from the sanding process.
- Completely dry the headlights: Use a microfiber cloth to completely dry the headlights, and they’re ready for the polymerization process.
Step 5: Polymerization
Now, this is where the magic happens. Make sure to refer to your specific kit for instructions, but generally, the process is similar. This is how I do it every single time:
- Prepare the polymer: Insert the polymer into a bottle provided in the kit, attach the nozzle to the bottle, turn on the polymer, and allow it to heat for three to four minutes. Once it’s heated enough, you’ll see the vapor coming out of a nozzle (it’s barely visible, so make sure not to wait too long).
- Apply the vapor: Carefully move the vapor applicator nozzle over the headlight surface slowly, working from the bottom. Go in left to right directions. You’ll see the haze clear instantly. Finish the headlights. You can even do two passes if you want – nothing bad will happen.
- Repeat on the other headlight: Follow the same polymerization process on the other headlight.
- Curing time: I recommend that you avoid washing your car for at least 12 hours. This allows the polymer to fully harden and set.
Step 6: Extra Protection For Headlights (Optional)
If you want even longer-lasting clarity and protection, you might want to add additional protection to your car’s headlights.
You should consider:
- Ceramic coating: You can apply a ceramic coating over your polymerized headlights.
- PPF (Paint Protection Film): You can also install a PPF over the headlights for ultimate protection. Paint protection films last longest and provide the best protection for headlights against UV rays and other harmful factors.
In both cases, remember to wait 12 hours for the polymer to fully fuse with the headlight before applying any additional protection.
And that’s it, you saved yourself a couple of hundred bucks, and now you have perfectly clear, like new car headlights, and you’re good to go for a couple of more years with them.
Related: