11 Car Paint Correction Tips To Become Better at Polishing
Car Detailing Planet is a part of Amazon Associates. As an Amazon Associate, we earn from qualifying purchases. Read our Affiliate Disclosure to learn more.

In this post, I’ve got something special. I decided to share eleven car paint correction tips that helped me to become better at polishing and compounding cars.
Following these tips will:
- Improve polishing results you get
- Shorten the polishing time (increase efficiency)
- Reduce the chances of burning the paint
Whether you’re polishing using a machine polisher or polishing by hand, you can implement those tips in your daily polishing routine.
If you’re not a complete beginner, you probably know most (if not all) of them. However, it’s still good to remind yourself from time to time.
1. Always Start With The Least Abrasive Product
Even though everyone keeps saying this, I still believe that it’s one of the most common mistakes beginners make. They just see an ad for “the best polish liquid” out there and instantly buy and use it, regardless of the car’s paint condition.
After you check the condition of the paint and determine what type of scratches your car has, you should always start with the least abrasive polish or compound.
Then, if that product isn’t abrasive enough to remove those paint defects, use the more abrasive one.
2. Don’t Use Too Much Polishing Compound
Using too much of a compound won’t get you better results. The only thing you’ll get is the product spreading everywhere.
More product doesn’t necessarily mean better results. It’s the opposite. You should use only as much product as needed or as instructed on the product’s label.
In general, 3-5 dots of the polish or compound is entirely enough to polish one section, which should always be 2x2ft.
3. Don’t Use Full Speed On Your Polisher
I see many people recommending choosing the highest speed on the polisher. I don’t think that’s good for doing a high-quality paint correction, especially if you’re working with a rotary machine polisher.
By using the highest speeds, you’re increasing the chances of burning the paint, especially if you’re using a rotary polisher.
In general, around 1500 RPM speed is more than enough for most polishers to get the job done. Check the polisher’s user manual to see which speed is around 1500 RPM.
If you don’t have a polisher and would love to buy one, check my article on the best affordable car polishers.
4. Keep The Buffing Pad Flat
While you’re polishing, try to keep your pad as flat as possible. Don’t ever polish at any angle unless you want some extra-cut properties.
When you keep the pad flat, you’re ensuring that even pressure is all over the surface and that the pad is evenly removing a clear coat.
If you polish at an angle, you’re increasing the chances of burning the paint, and you’re also removing uneven layers of clear coat.
5. Don’t Rush, Go Slowly
When you rush, you don’t give the polisher enough time to correct the defects in the paint. You may think that you’ll get the job done quicker, but it’s not the truth.
Go slowly. That way, you’ll give the polish and the pad enough time to cut the paint, remove all defects, and bring back the paint’s original shine and gloss.
However, make sure to move the polisher constantly. That way, you won’t create a hotspot and damage the paint.
6. Don’t Use Too Much Pressure On The Polisher
I see too many people pressing the polisher wildly, thinking they’ll get the job done quicker or better. In reality, you’ll just cause additional damage to the paint.
To fix paint imperfections, you need to choose suitable pads and polishes (or compounds), not the pressure.
Only around 10-12 pounds of pressure is enough. Most machine polishers weigh about 5-7 pounds, so you only need to add approximately 5-7 pounds of pressure. Mostly, that’s the weight of your arm.
The great advice I’ve seen on the internet is to practice your pressure on a scale. Put the polisher on a scale, and press it until 10-12 pounds show on the scale. Repeat that more times. Try with your eyes closed until you get used to that amount of pressure used.
7. Do Overlapping Passes on The Paint
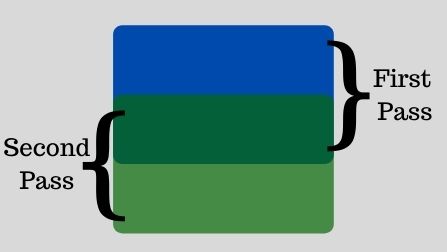
Whenever you’re polishing, always do overlapping passes. You should only do straight movements (left-right and up-down).
So, when you finish one pass to the left, when you go back to the right, cover 50% of the area you just polished to the left. The same applies when you’re doing up-down movements.

I usually do two sets left and right, two sets up and down. In most situations, that’s enough to polish one section (2x2ft) of the car’s paint.
8. Use High-Quality Products, But Don’t Rely On Them
High-quality products are essential, but they’re not making you a better detailer. If you don’t have the skill, no product will help you. Whether it’s a machine polisher or a compound.
I once tried car polish from Lidl, and that was a disaster. It couldn’t polish out even the tiniest swirl mark. You get what you pay for. After that, I bought some paste from Sonax, and it worked wonders.
So, my advice is to practice a lot, and don’t rely on the products only. When you achieve these skills, high-quality products will make the difference from a good and well-done job.
9. Always Use Finishing Polish After Compounding
If you’re not using all-in-one products that both compound and polish, giving you a perfect glossy finish, you should always use a finishing polish after compounding.
A compound removes scratches but leaves some haziness behind, which you then need to remove by using a finishing polish. Finishing polish will bring the shine back and give it that deep gloss.
I know that it’s obvious, but many people make this mistake. If you want the best polishing job done, always follow all the rules and guidelines given by the manufacturer and other pro detailers.
10. Practice On Parts That You Don’t Need
The worst thing you can do is practice on your new car or, even worse, someone else’s car. If you can, buy some old spare parts and practice polishing them until you gain skills and confidence.
If you drive a car that has awful paint, and you don’t have anything to mess up, you can practice on that one too. Just don’t practice on new and expensive cars. You may do more harm than good.
To make it clear, I don’t want to scare you, but I need to be objective and realistic. Some damage may occur while you’re learning. That’s why I’m giving you these tips – by following them, the chances of doing any damage are significantly reduced.
11. Use an LED Light To Inspect The Surface
I like to watch TikTok videos a lot, and many detailing people brag about great polishing results, but they shoot videos without the lights ON to show scratches.
When you use dedicated auto detailing LED lights, you’ll only then see if you did a good job or if there are still swirl marks and scratches left behind.
If a color looks perfect when you light it, then you’re finished. If there are still scratches, repeat the polishing process.
You can use many fantastic LED flashlights. One very affordable but high-quality flashlight is Adam’s Swirl Finder Flashlight.
FAQs
Car paint correction is a process that involves the removal of surface imperfections on a car’s paintwork, such as swirl marks, scratches, oxidation, and etching.
Car paint correction is necessary to maintain the aesthetic appeal of your vehicle. It helps in removing minor scratches, swirl marks, and other imperfections that can dull the car’s finish over time.
The steps involved in car paint correction include washing and drying the car, clay bar treatment, polishing using a machine buffer, and finally, sealing the paint with high-quality wax, sealant, or ceramic coating.
Yes, with the right tools and techniques, you can perform car paint correction yourself. However, it requires patience and attention to detail. If not done correctly, it can potentially damage the car’s paintwork.
The difference is that car detailing is a comprehensive cleaning and reconditioning process for your car, both inside and out. Paint correction is just a specific part of the detailing process that focuses on removing imperfections from the car’s paint.
Related Post: Common Car Polishing Mistakes

